![]()
|
[ Larger View ] |
|
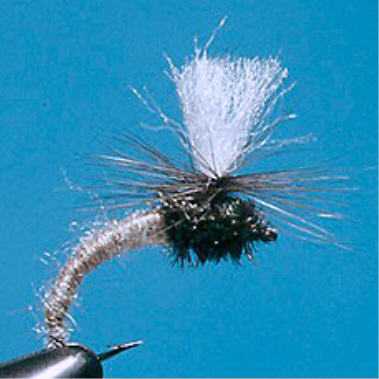
Klinkhamer Special |
| Hook: | Partridge GRS15ST, size 8-18 for trout. Partridge CS54 size 6 and 4 for salmon | |
| Thread: | Uni-thread, 8/0 | |
| Body: | Poly dubbing color to match natural | |
| Wing: | white, hot pink, or orange poly-yarn | |
| Hackle: | Blue dun, dark dun, light dun, chestnut all in good combination with the body color. | |
|
Tying Instructions 1.Place the hook in the vice and wrap the entire shank with the tying thread. This avoids the difficulty of a slipping wing when the fly is finished. Cut off a strand of poly-yarn and taper the tip with your scissors before tying in; this is to be sure the underbody will be as slim as possible. 2.Secure the yarn onto the top of the hook shank 3.Wrap the thread down to the bend and back up. 4.Make a nice tapered under body. I like a slim and well-tapered under body. This stage is important. The better the under body the better looking the fly will be. 5.Tie in the hackle so it lies in the same orientation as the yarn. Form an upright wing by tying up the yarn and hackle. This is to be sure you have no problems with the hackle in the other tying steps. 6.Apply a small amount of dubbing to the thread. Take as much dubbing just to cover the under body. Tie the body very slim and well tapered. Start as close to the barb as possible. The thinner the body the more successful the pattern. Wind it along the shank and stop just behind the wing and cut off surplus poly or use the last piece of dubbing as underground for the thorax. In that situation it is not really necessary to cut off surplus. I recommend trying both techniques because for some people it is much easier to produce a better-looking thorax when you have made an under body 7.Tie in three peacock herl fibres. You can also tie the strands in at their tips, this will help you to create a much nicer thorax. I secure the strands well also behind the wing. This provides that the thorax will come off. 8.Wind the hackle around the base. Start at the top of the wing base and wrap the hackle down to the thorax. Small flies take about 5 wraps and bigger ones at least 7 or 8. Remember that the fly has to float mainly on the parachute. Working from top down ensures a compact well-compressed hackle and durable construction. Pull the hackle tip to the opposite direction as the wing and. Secure well around the base of the wing between the wound hackle and body. Using your whip finisher. Trim away the waste hackle tip and hackle fibres that are pointed down. Take your cement applicator and apply some finish on the wraps just under the parachute. 9.Whip finish and cement.
|